NVIDIA® Jetson Nano™ 开发者套件是一款面向创客、学习者和开发者的人工智能计算机。官方入门级深度学习教程 Jetson Inference(Hello AI World)仓库使用 NVIDIA TensorRT 将神经网络有效地部署到 Jetson 平台上,以体验三种最常见的计算机视觉 AI——图像识别、对象检测、和语义分割。

《Jetson Nano 2GB 开发套件动手玩》已经介绍了 Jetson Nano Developer Kit 的安装和配置,《Jetson Nano 人工智能开发者套件》也介绍了硬件的基本信息,本实践实际是将利用高算力训练获得的模型参数部署到边缘设备执行深度学习推理的过程。
在官方镜像(Jetson Nano Developer Kit SD Card Image)中包含(1)Ubuntu 18 操作系统,集成Python 2.7/3.6,(2) Jetson 开发套件(JetPack SDK),主要包括以下组件:
- TensorRT和cuDNN:用于高性能深度学习应用
- CUDA:用于GPU加速计算等应用
- Multimedia API package:用于相机相关的应用及传感器驱动开发
- VisionWorks和OpenCV:用于计算机视觉开发
在安装官方入门级深度学习教程 Jetson Inference(Hello AI World)过程中,自动包含 PyTorch 和预训练模型的安装(如果选择并安装成功的话)。作为官方推出的体验套件,它提供了三种最常见的AI应用于计算机视觉的类型,imagenet用于图像识别(Image Recognition)、detectNet用于对象检测(Object Detection)、segNet用于语义分割(Semantic Segmentation)。
- 图像识别:Classifying Images with ImageNet
- 对象检测:Locating Objects with DetectNet
- 语义分割:Semantic Segmentation with SegNet
以下以源方式说明下载、编译和安装 Jetson Inference 的过程,以及此在过程中下载预训练模型及安装深度学习框架 PyTorch。另有容器 Docker Container 的方式实现,运行预构建的 Docker 容器,而无需自己编译项目或安装 PyTorch,可搜索学习(官方强烈建议使用这些容器来减少以下框架的安装时间,以及初学者入门)。
安装 jetson-inference
# 更新系统
$ sudo apt update
$ sudo apt upgrade

# 安装cmake
$ sudo apt-get install cmake
# 加上更多依赖包也行
$ sudo apt-get install cmake libpython3-dev python3-numpy

# 获取源码
$ git clone --recursive https://github.com/dusty-nv/jetson-inference
# GitHub仓库使用不畅的,换用Gitee仓库
$ git clone --recursive https://gitee.com/missren/jetson-inference

# 更新 submodule
$ cd jetson-inference
$ git submodule update --init

# 创建目录树
$ mkdir build
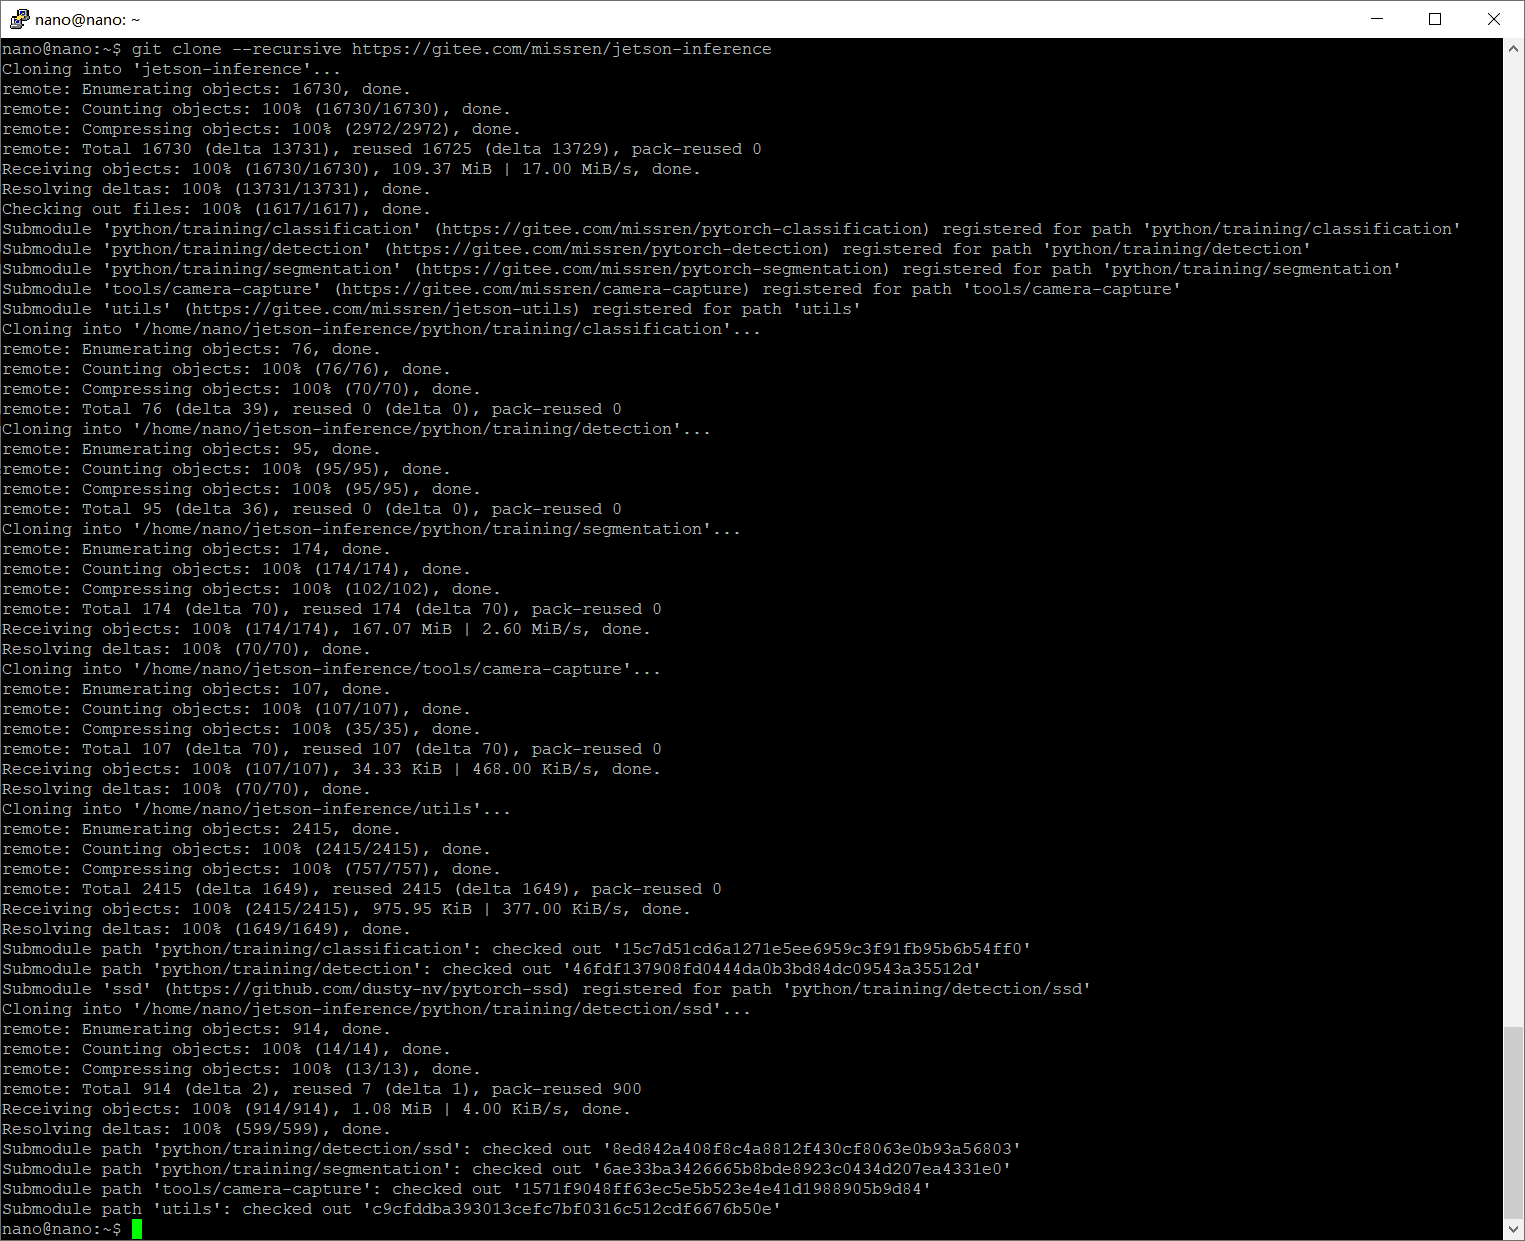
由于 https://gitee.com/missren/jetson-inference 已将 .gitmodules 中的 repo 源完全同步在 Gitee 仓库,并修改路径;还修改了 PyTorch-detection 中的 PyTorch-ssd 源路径,实现极大可能的顺利下载。如偶遇网络失败,可重复执行 git clone 步骤。
# 编译安装
$ cd build

# 执行 CMakePrebuild.sh
$ cmake ../

# 编译
$ make

# 安装
$ sudo make install
$ sudo ldconfig
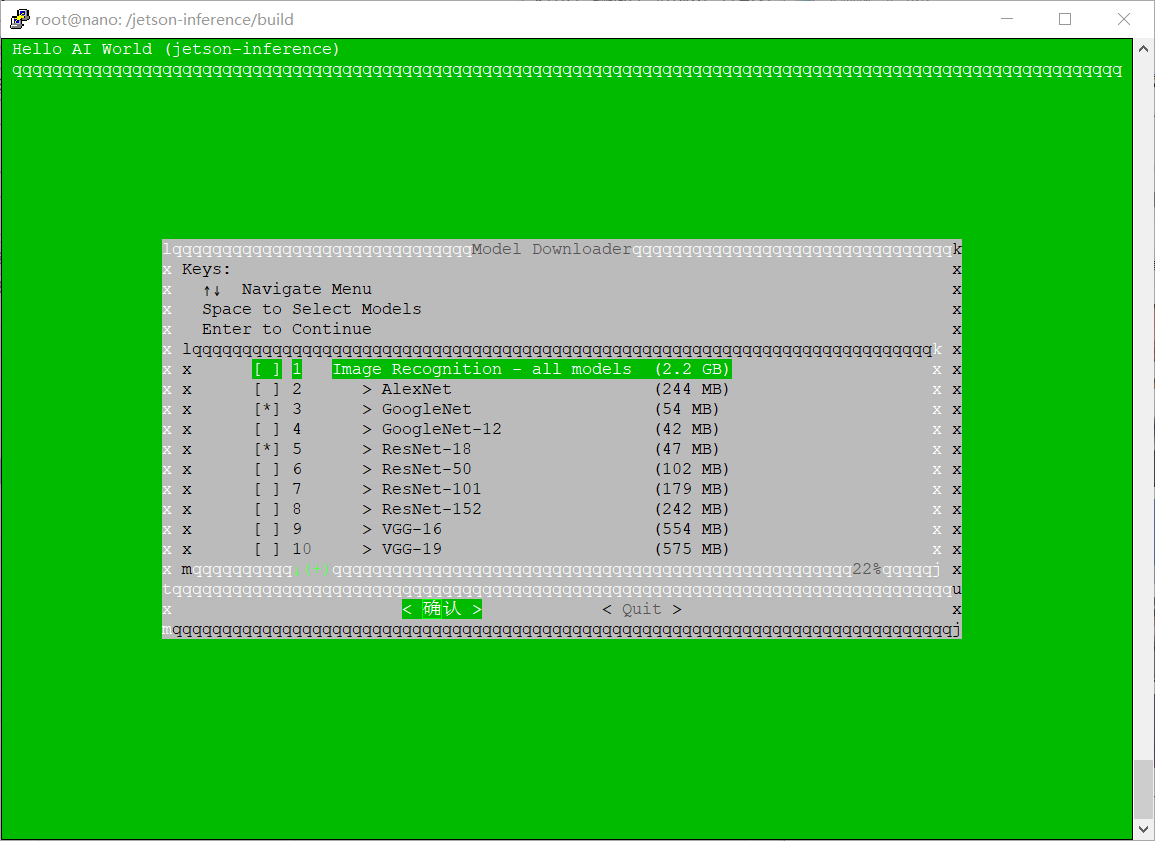
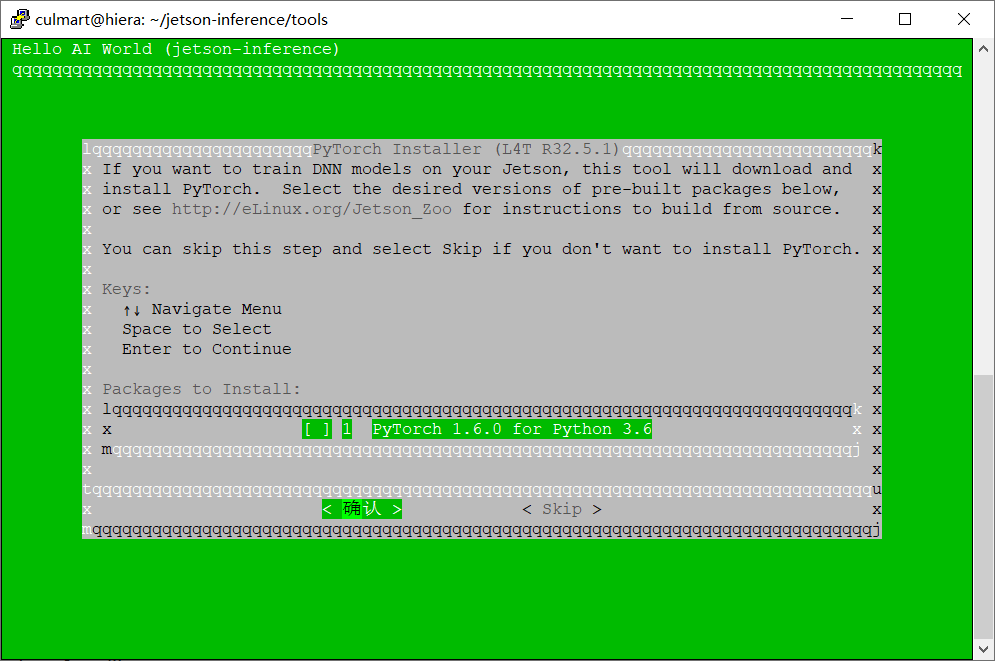
编译过程中需要下载一些预训练 DNN(Deep Neural Networks,深度神经网络)模型及安装 PyTorch,由于网络原因极大可能不成功。可以选择跳过这两个步骤,后面再单独安装。网络好用的可用以下命令分别安装,网络不好用的看后面详解。
$ cd jetson-inference/tools
$ ./download-models.sh
$ ./install-pytorch.sh
或者:
下载DNN模型
在构建过程中,存储 jetson-inference 库将自动尝试为您下载DNN模型,而这些模型存储在 Box.com 上,通常你无法访问到(测试您的网络,在
图像识别两个
- googlenet
- resnet-18
对象检测四个
- ssd-mobilenet-v2
- pednet
- facenet
- coco-dog
语义分割六个
- fcn-resnet18-cityscapes-512x256
- fcn-resnet18-cityscapes-1024x512
- fcn-resnet18-deepscene-576x320
- fcn-resnet18-mhp-512x320
- fcn-resnet18-voc-320x320
- fcn-resnet18-sun-512x400
或者尝试以下下载方式:
# 进入模型存放目录
$ cd jetson-inference/data/networks
# 使用wget下载各个模型,可根据实际需要下载
$ wget https://github.com/dusty-nv/jetson-inference/releases/download/model-mirror-190618/AlexNet.tar.gz
$ wget https://github.com/dusty-nv/jetson-inference/releases/download/model-mirror-190618/Deep-Homography-COCO.tar.gz
$ wget https://github.com/dusty-nv/jetson-inference/releases/download/model-mirror-190618/DetectNet-COCO-Airplane.tar.gz
$ wget https://github.com/dusty-nv/jetson-inference/releases/download/model-mirror-190618/DetectNet-COCO-Bottle.tar.gz
$ wget https://github.com/dusty-nv/jetson-inference/releases/download/model-mirror-190618/DetectNet-COCO-Chair.tar.gz
$ wget https://github.com/dusty-nv/jetson-inference/releases/download/model-mirror-190618/DetectNet-COCO-Dog.tar.gz
$ wget https://github.com/dusty-nv/jetson-inference/releases/download/model-mirror-190618/facenet-120.tar.gz
$ wget https://github.com/dusty-nv/jetson-inference/releases/download/model-mirror-190618/FCN-Alexnet-Aerial-FPV-720p.tar.gz
$ wget https://github.com/dusty-nv/jetson-inference/releases/download/model-mirror-190618/FCN-Alexnet-Cityscapes-HD.tar.gz
$ wget https://github.com/dusty-nv/jetson-inference/releases/download/model-mirror-190618/FCN-Alexnet-Cityscapes-SD.tar.gz
$ wget https://github.com/dusty-nv/jetson-inference/releases/download/model-mirror-190618/FCN-Alexnet-Pascal-VOC.tar.gz
$ wget https://github.com/dusty-nv/jetson-inference/releases/download/model-mirror-190618/FCN-Alexnet-SYNTHIA-CVPR16.tar.gz
$ wget https://github.com/dusty-nv/jetson-inference/releases/download/model-mirror-190618/FCN-Alexnet-SYNTHIA-Summer-HD.tar.gz
$ wget https://github.com/dusty-nv/jetson-inference/releases/download/model-mirror-190618/FCN-Alexnet-SYNTHIA-Summer-SD.tar.gz
$ wget https://github.com/dusty-nv/jetson-inference/releases/download/model-mirror-190618/FCN-ResNet18-Cityscapes-1024x512.tar.gz
$ wget https://github.com/dusty-nv/jetson-inference/releases/download/model-mirror-190618/FCN-ResNet18-Cityscapes-2048x1024.tar.gz
$ wget https://github.com/dusty-nv/jetson-inference/releases/download/model-mirror-190618/FCN-ResNet18-Cityscapes-512x256.tar.gz
$ wget https://github.com/dusty-nv/jetson-inference/releases/download/model-mirror-190618/FCN-ResNet18-DeepScene-576x320.tar.gz
$ wget https://github.com/dusty-nv/jetson-inference/releases/download/model-mirror-190618/FCN-ResNet18-DeepScene-864x480.tar.gz
$ wget https://github.com/dusty-nv/jetson-inference/releases/download/model-mirror-190618/FCN-ResNet18-MHP-512x320.tar.gz
$ wget https://github.com/dusty-nv/jetson-inference/releases/download/model-mirror-190618/FCN-ResNet18-MHP-640x360.tar.gz
$ wget https://github.com/dusty-nv/jetson-inference/releases/download/model-mirror-190618/FCN-ResNet18-Pascal-VOC-320x320.tar.gz
$ wget https://github.com/dusty-nv/jetson-inference/releases/download/model-mirror-190618/FCN-ResNet18-Pascal-VOC-512x320.tar.gz
$ wget https://github.com/dusty-nv/jetson-inference/releases/download/model-mirror-190618/FCN-ResNet18-SUN-RGBD-512x400.tar.gz
$ wget https://github.com/dusty-nv/jetson-inference/releases/download/model-mirror-190618/FCN-ResNet18-SUN-RGBD-640x512.tar.gz
$ wget https://github.com/dusty-nv/jetson-inference/releases/download/model-mirror-190618/GoogleNet-ILSVRC12-subset.tar.gz
$ wget https://github.com/dusty-nv/jetson-inference/releases/download/model-mirror-190618/GoogleNet.tar.gz
$ wget https://github.com/dusty-nv/jetson-inference/releases/download/model-mirror-190618/Inception-v4.tar.gz
$ wget https://github.com/dusty-nv/jetson-inference/releases/download/model-mirror-190618/multiped-500.tar.gz
$ wget https://github.com/dusty-nv/jetson-inference/releases/download/model-mirror-190618/ped-100.tar.gz
$ wget https://github.com/dusty-nv/jetson-inference/releases/download/model-mirror-190618/ResNet-101.tar.gz
$ wget https://github.com/dusty-nv/jetson-inference/releases/download/model-mirror-190618/ResNet-152.tar.gz
$ wget https://github.com/dusty-nv/jetson-inference/releases/download/model-mirror-190618/ResNet-18.tar.gz
$ wget https://github.com/dusty-nv/jetson-inference/releases/download/model-mirror-190618/ResNet-50.tar.gz
$ wget https://github.com/dusty-nv/jetson-inference/releases/download/model-mirror-190618/SSD-Inception-v2.tar.gz
$ wget https://github.com/dusty-nv/jetson-inference/releases/download/model-mirror-190618/SSD-Mobilenet-v1.tar.gz
$ wget https://github.com/dusty-nv/jetson-inference/releases/download/model-mirror-190618/SSD-Mobilenet-v2.tar.gz
$ wget https://github.com/dusty-nv/jetson-inference/releases/download/model-mirror-190618/Super-Resolution-BSD500.tar.gz
$ wget https://github.com/dusty-nv/jetson-inference/releases/download/model-mirror-190618/VGG-16.tar.gz
$ wget https://github.com/dusty-nv/jetson-inference/releases/download/model-mirror-190618/VGG-19.tar.gz
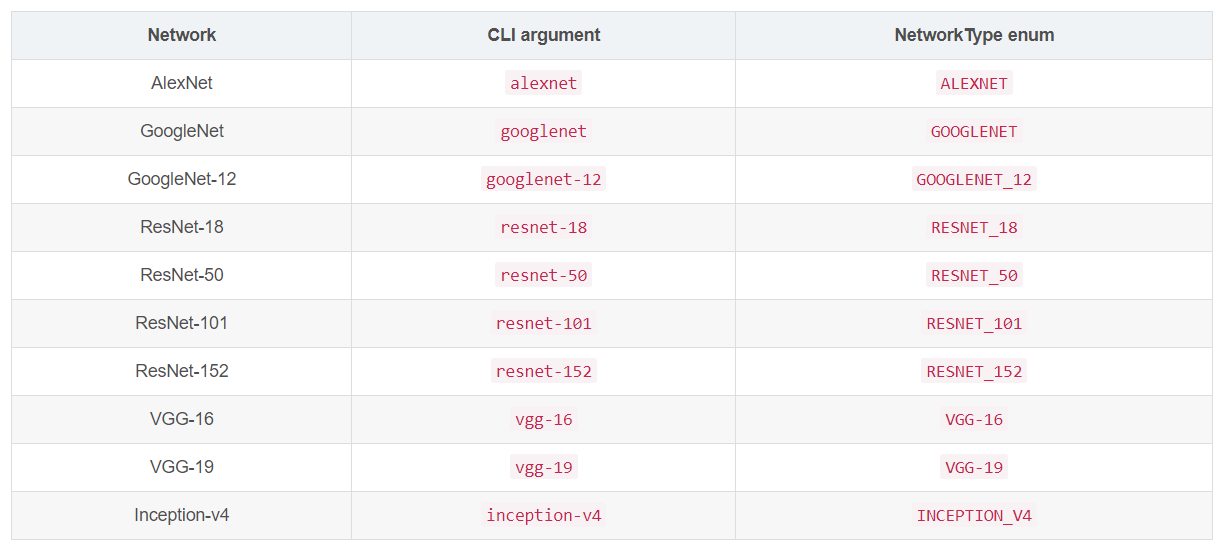
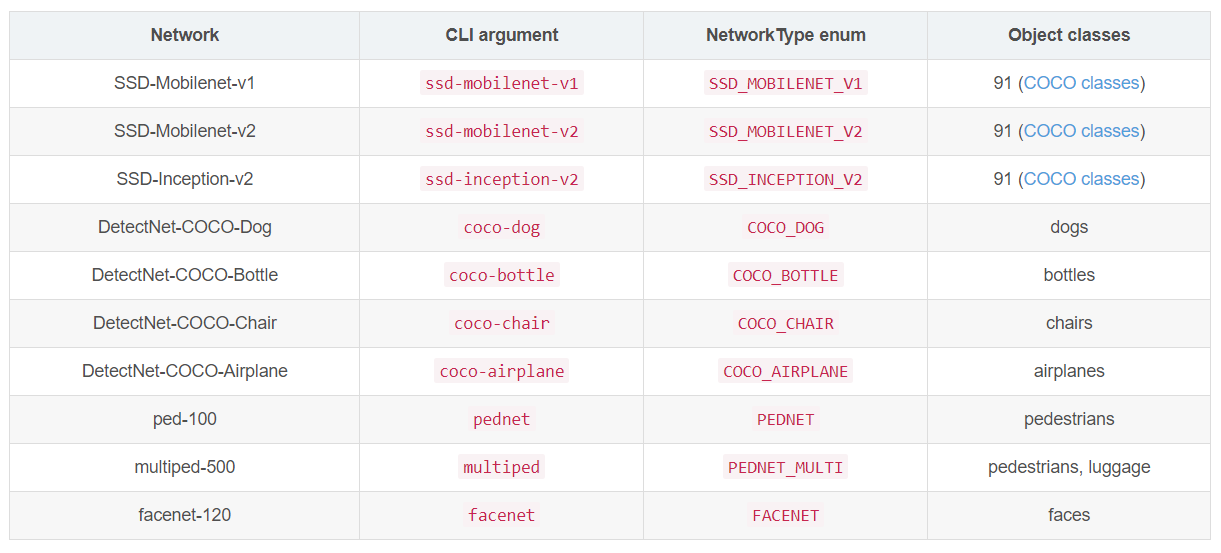
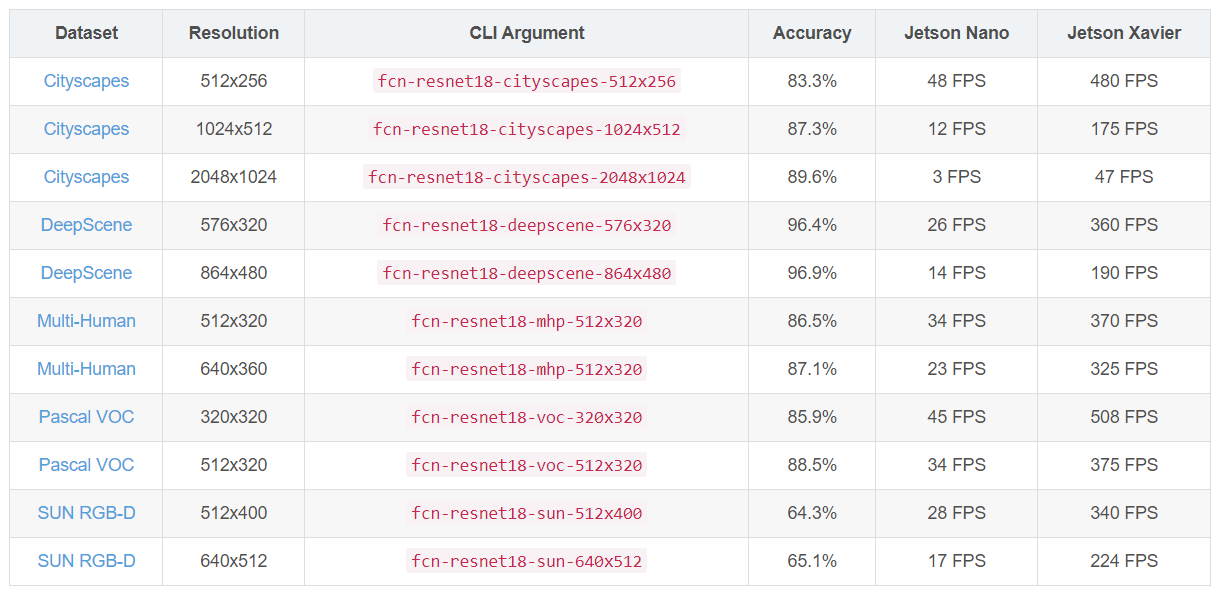
这些预训练模型的简单介绍:
图像识别
对象检测
语义分割
旧版细分模型(已不在 DNN 列表中)

然后将需要用到的预训练模型解压缩:
$ cd <jetson-inference>/data/networks/
$ tar -zxvf <model-archive-name>.tar.gz

# 或者批量解压缩:
$ for tar in *.tar.gz;  do tar xvf $tar; done

# 删除所有压缩包
$ sudo rm -R *.tar.gz
折腾下载不容易,存储空间够用的话可以将压缩包移到其他文件夹,以备后用。
接下来继续执行编译
由于已经下载完成模型,所以需要注释 jetson-inference/CMakePreBuild.sh 编译脚本中对模型下载脚本(download-models.sh)的调用;回到 jetson-inference 根目录,编辑 CMakePreBuild.sh 文件,将 ./download-models.sh $ BUILD_INTERACTIVE 注释掉(当然也可以在出现以上安装界面时直接选择取消以继续)。
$ sudo nano CMakePreBuild.sh
# ./download-models.sh $ BUILD_INTERACTIVE

$ cd build
$ cmake ../
$ make
$ sudo make install
$ sudo ldconfig
问题又来了,编译过程中会安装 PyTorch,相关文件下载可能会很慢。
安装PyTorch
PyTorch 是一个以 Python 优先的深度学习框架,能够实现强大的 GPU 加速,同时支持动态神经网络。
可以手工下载并本地安装 PyTorch 的 whl 文件,然后修改 jetson-inference/tools/install-pytorch.sh 脚本,注释 install pytorch wheel 的命令行。
注意 PyTorch 的 whl 文件与 Jetpack 和 python 的版本相匹配,以及对应版本的 torchvision(在所有 Linux 环境,都需特别留意版本问题)。
在安装 PyTorch 前先执行:
$ sudo apt-get install python3-pip libopenblas-base libopenmpi-dev
$ pip3 install cython
$ pip3 install numpy
如下载获得 torch-1.6.0-cp36-cp36m-linux_aarch64.whl,并上传到 Jetson Nano,执行安装:
$ sudo pip install torch-1.6.0-cp36-cp36m-linux_aarch64.whl
# or
$ pip3 install torch-1.6.0-cp36-cp36m-linux_aarch64.whl
如果由于权限等问题需要重复安装,不妨试试
sudo -H pip3 install --force-reinstall torch-1.6.0-cp36-cp36m-linux_aarch64.whl
安装完 PyTorch 以后验证测试:
culmart@hiera:~$ python3
Python 3.6.9 (default, Jan 26 2021, 15:33:00)
[GCC 8.4.0] on linux
Type "help", "copyright", "credits" or "license" for more information.
>>> import torch
>>> print(torch.__version__)
1.8.0
安装成功。
安装 torchvision
torchvision 库是独立于并服务于 PyTorch 的机器学习框架,包括流行的数据集、模型架构和常见图像转换。使用 pip 安装。
$ pip3 install torchvision
安装完 torchvision 以后验证测试:
culmart@hiera:~$ python3
Python 3.6.9 (default, Jan 26 2021, 15:33:00)
[GCC 8.4.0] on linux
Type "help", "copyright", "credits" or "license" for more information.
>>> import torchvision
>>> print(torchvision.__version__)
0.9.1
安装成功。
好了,DNN 模型及 PyTorch 及 torchvision 都下载安装好了,继续编译安装 jetson inference。
$ cd build
$ cmake ../
$ make
$ sudo make install
$ sudo ldconfig
安装完 jetson inference 以后验证测试:
culmart@hiera:~/jetson-inference/build
$ python3
Python 3.6.9 (default, Jan 26 2021, 15:33:00)
[GCC 8.4.0] on linux
Type "help", "copyright", "credits" or "license" for more information.
>>> import jetson.inference
>>> import jetson.utils
>>>
没有错误提示则说明安装成功。
jetson-inference 项目测试
以下是图像识别的测试程序,Jetson-Inference 在影像分类部分采用 ILSVRC ImageNet 数据集,这个数据集拥有 1000 个常见的类别;默认使用图像识别预训练模型 Googlenet(networks/bvlc_googlenet.caffemodel),需预先确认模型已安装,也可以使用 --network=xxx 换用其他图像识别模型。
ILSVRC(ImageNet Large Scale Visual Recognition Challenge)是近年来机器视觉领域最受追捧也是最具权威的学术竞赛之一,代表了图像领域的最高水平。ImageNet 数据集是ILSVRC竞赛使用的是数据集,由斯坦福大学李飞飞教授主导,包含了超过1400万张全尺寸的有标记图片。
$ cd build/aarch64/bin
# 运行测试程序
$ ./imagenet-console ./images/dog_2.jpg ./images/test/output_dog.jpg
# 或者
$ ./imagenet.py ./images/dog_2.jpg ./images/test/output_dog.jpg
会有如下输出
imagenet: shutdown complete.
推论完成,同时会在
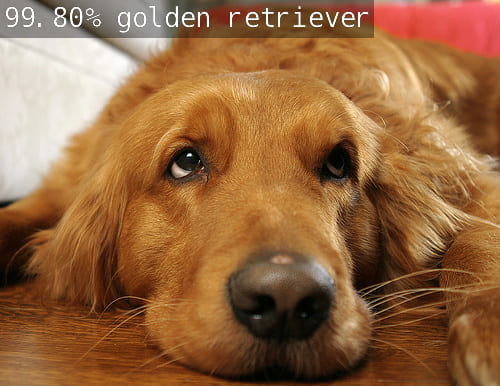
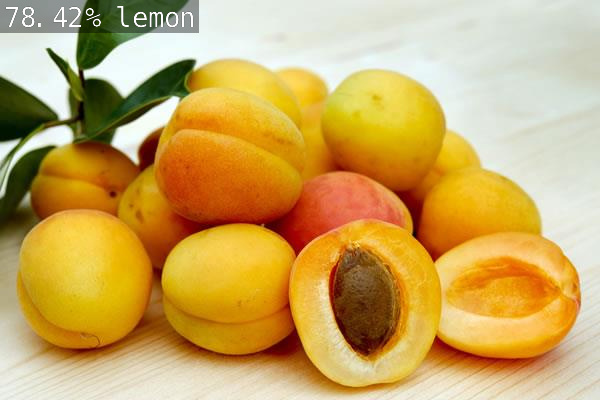
再测试一张图片,Googlenet 不认得杏果(Apricot)。
其他使用 detectNet 用于对象检测、segNet 用于语义分割的实践将在后续学习。
更多程序说明
执行程序位于 jetson-inference/build/aarch64/bin,有 .py 代表是 Python 程序所撰写的,而没有附档名的部分则是 C++ 程序所撰写,都可以直接执行。
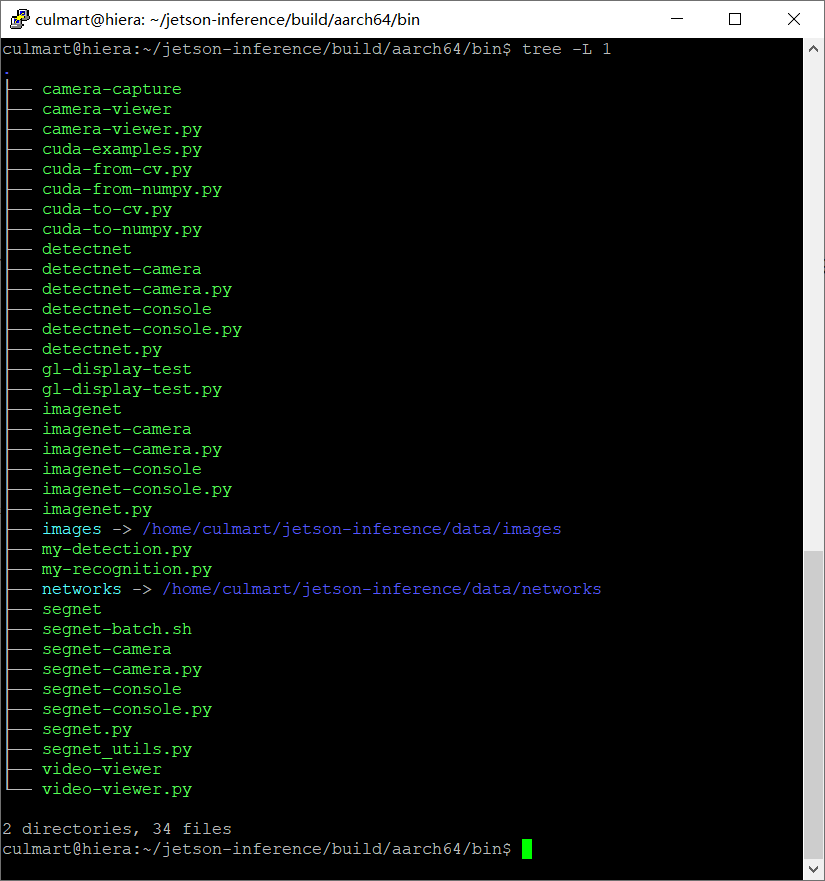
执行方式
$ ./imagenet
$ ./imagenet.py
如果使用远程方式,需选择含有 “-console”的执行程序。
常用参数
jetson-inference 的三个示例用到 imagenet、detectnet、segnet 三个计算机视觉任务,常用的参数主要是要输入到神经网络的内容是图片、视频还是实时影像。
图片和视频
# 填写文件名,后面搭配一个输出的文件名
$ ./imagenet-console ./images/dog_2.jpg ./images/test/output_dog.jpg
实时影像
提供 CSI(Camera Serial Interface)、V4L2(Video4Linux)、RTP/RTSP(Real Time Streaming Protocol)三种协议。
# MIPI CSI camera
$ ./imagenet.py csi://0

# V4L2 camera
$ ./imagenet.py /dev/video0

# save to video file
$ ./imagenet.py /dev/video0 output.mp4
caemra-capture 程序
可以拍照搜集数据。
相关技术
更改 Python 的软连接
通常将 Python 2.7 换成 Python 3.6。
# linux的软连接存放位置
$ cd /usr/bin

# 查看现有python的软连接指向的版本
$ ls -al *python*

# 删除旧的软连接
$ rm python

# 建立新的软连接
$ ln -s python3.6 python

# 查看软连接版本
$ python -V
安装 pip
$ wget https://bootstrap.pypa.io/get-pip.py
$ sudo python3 get-pip.py
安装Jtop
Jtop 是Raffaello Bonghi 专门为 Jetson 系列制作的一款出色的调试工具,以查看 Jetson Nano 的基本配置和状态。
$ sudo -H pip3 install -U jetson-stats

# 完整性能监控窗口
$ sudo jtop

# 显示 NVIDIA Jetson 的状态和所有信息
$ jetson_release

# 查看各资源信息
$ tegrastats
PSCP 上传文件
PuTTY 官方网站提供 PSCP 工具(基于ssh协议实现)可实现从上位机上传文件及文件夹到 Jetson Nano,基本命令格式:pscp 文件 用户名@Jetson Nano IP:目录,如:
pscp edu.jpg culmart@192.168.3.119:/home/culmart/jetson-inference/build/aarch64/bin/images/
下载文件的命名格式如:
pscp culmart@192.168.3.119:/home/culmart/jetson-inference/build/aarch64/bin/images/edu.jpg d:/
总结:
基于 Linux 的安装部署不成功,主要原因是获取源码和下载较大文件时出现联网故障,因此使用迁移代码库和下载至本地安装即可。
如果按照标准流程可以流畅地执行下去,则不用更多折腾,以下是全程命令。
$ sudo apt update
$ sudo apt upgrade
$ sudo apt-get install cmake
$ git clone --recursive https://gitee.com/missren/jetson-inference
$ cd jetson-inference
$ git submodule update --init
$ mkdir build
$ cd build
$ cmake ../
$ make
$ sudo make install
$ sudo ldconfig
完成环境
硬件部分
- Windows PC
- Jetson Nano 2GB Developer Kit
- Micro-USB 数据线
- 5V⎓2A USB-C 电源
- 32 GB 以上 UHS-1 卡
- 网线
系统配置
NVIDIA Jetson Nano (Developer Kit Version)
- Jetpack 4.5.1 [L4T 32.5.1]
- NV Power Mode: 5W - Type: 1
- jetson_stats.service: active
Libraries:
- CUDA: 10.2.89
- cuDNN: 8.0.0.180
- TensorRT: 7.1.3.0
- Visionworks: 1.6.0.501
- OpenCV: 4.1.1 compiled CUDA: NO
- VPI: ii libnvvpi1 1.0.15 arm64 NVIDIA Vision Programming Interface library
- Vulkan: 1.2.70
以上诸多版本号仅为当前示范,您的具体安装实例可能与此不同。
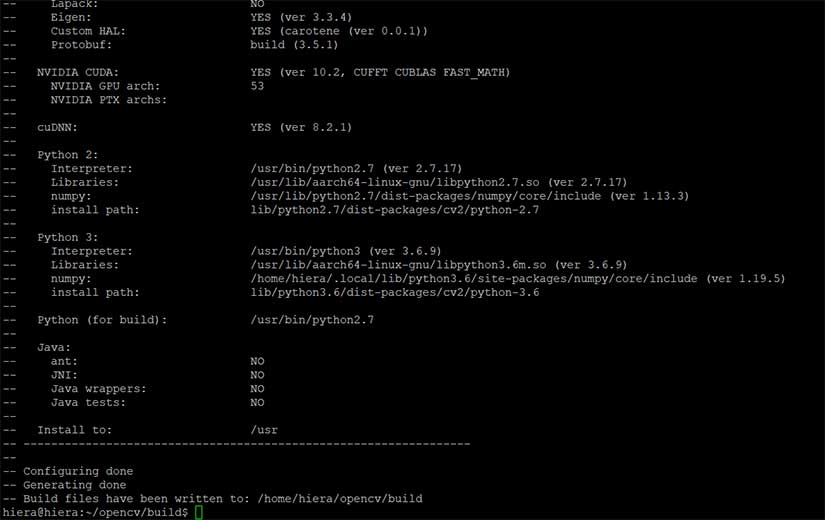
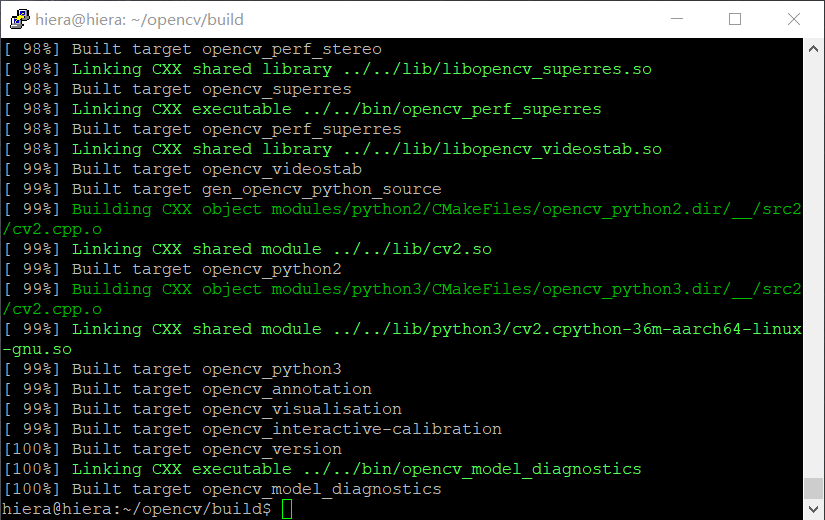
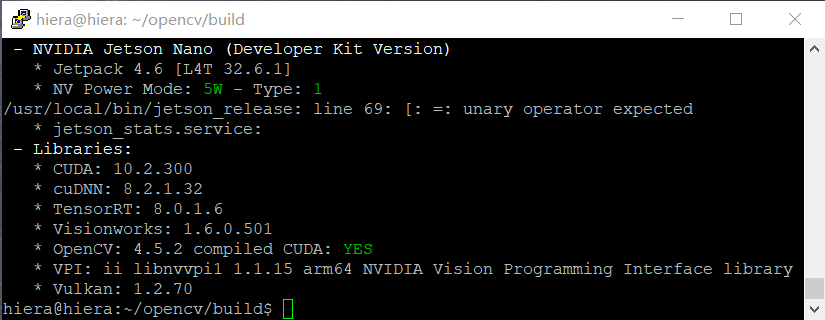
注意:compiled CUDA的选项是NO,OpenCV 带有优秀的深度学习框架模块,使用CUDA来帮助OpenCV的一些AI应用加速是Jetson Nano的价值所在。需要从源代码重新构建OpenCV,具体可以参考《在 Jetson Nano 上安装 OpenCV》,以下是一些过程截屏。
最后,提供一个 Jetson Nano 的资源分享包:包括 Jetson Nano 官方镜像、DNN 模型及 PyTorch(版本见上面完成环境列表):
链接:https://pan.baidu.com/s/1E95CKisbCLTGKGI6c-JydA
提取码:culm
参考资料
本文参考 Jetson Inference 官方构建文档,NVIDIA 深度学习入门系列教程 Two Days to a Demo 有全流程指导(包含视频),Jetson Zoo 包含在 NVIDIA Jetson 上安装各种开源插件包和框架的说明。
酷玛 Play Jetson Nano 主题文章列表
- Jetson Nano 人工智能开发者套件
- Jetson Nano 2GB 开发套件动手玩
- Jetson Nano 2GB 深入 Jetson Inference 项目
- Jetson Nano 模型训练和推理流程
- NVIDIA Jetson:适用于一切自主机器的AI平台
- Jetson Nano “低技术”网站搭建复盘
更多链接
👍


楼主残忍的关闭了评论